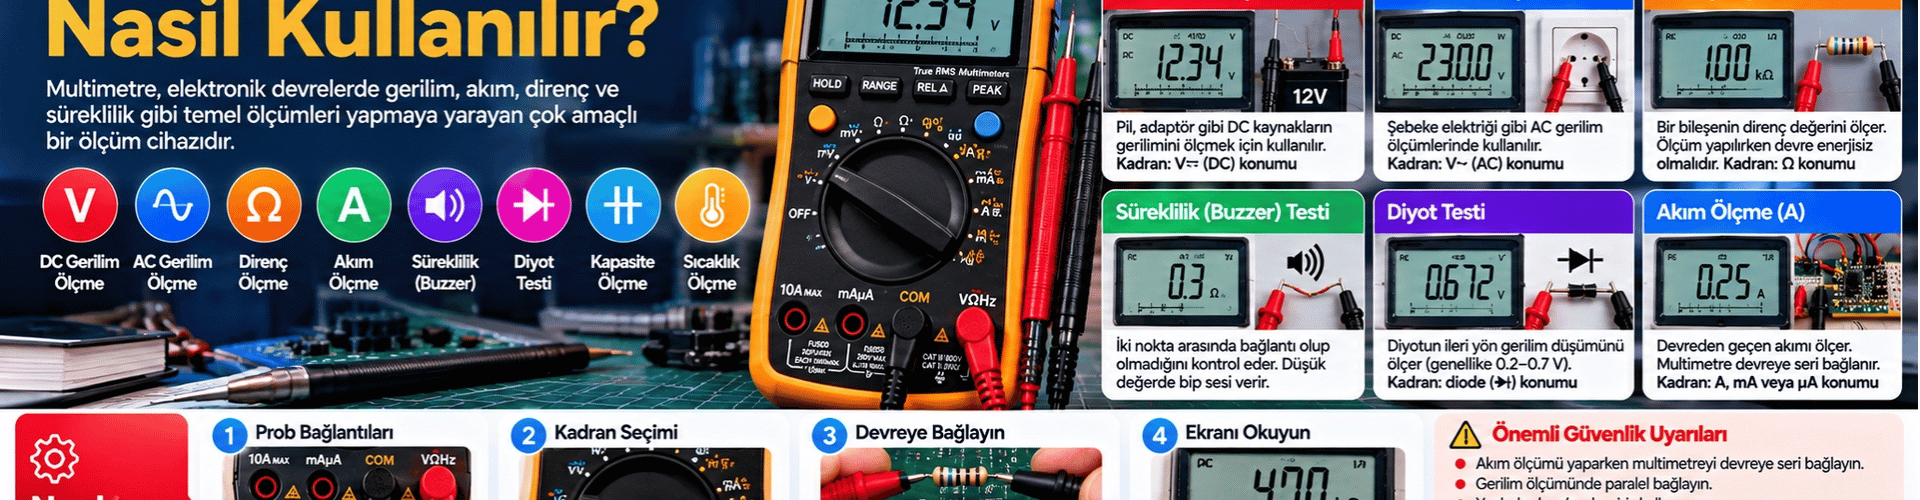
A multimeter is a measuring instrument that can measure current, voltage, resistance and similar values in electrical circuits, and also allows fault checking in a circuit. With a multimeter, multiple measurements can be easily made with a single device. It is the most commonly used measuring instrument in the electrical sector.
It is derived from the English words multi and meter, and can be translated as "multiple meter".
The most basic things measured with a multimeter are voltage and current. It also allows checking whether electrical circuits are working and whether cable connections are made correctly. In addition, it can be used for transistor, continuity and diode tests in home and automotive products. In short, it is a multifunctional measurement and control device.
How to use a multimeter?
The multimeter can be used easily through its parts, buttons and digital display.
To use a digital multimeter, you must first be familiar with its parts and functions.
Parts of a multimeter
A multimeter consists of 3 parts: display, selection knob and ports.
The display usually has four digits and has a negative sign feature. Some multimeters have illuminated displays for better viewing in low light environments.
The selection knob allows the user to select different values such as current (mA), voltage (V) and resistance (Ω) on the multimeter.
The ports are the input terminals where the probes are plugged in.
How to connect multimeter probes?
The probes are plugged into the two ports on the front of the unit. COM means common terminal and is always connected to the "ground" or "-" of a circuit. Traditionally, the black probe is plugged into the COM terminal; however, there is no difference between the red probe and the black probe other than color. 10A is a special port used for measuring large currents (greater than 200 mA). mAVΩ is the port where the red probe is plugged. This port allows measurement of current (up to 200 mA), voltage (V) and resistance (Ω).
After plugging in the probes, we can proceed to measurement.
Measuring voltage with a multimeter
Before explaining voltage measurement, let's measure the voltage of a battery.
Measuring a battery with a multimeter
If you are measuring DC voltage (like a battery or a sensor connected to an Arduino), you should set the knob to the straight line part of V.
To measure AC voltage, set the knob to the part with the wavy line.
To measure a battery, connect the black probe to the COM terminal and the red probe to the mAVΩ terminal. Set the multimeter to "2V" in the DC range. Connect the black probe to the '-' terminal and the red probe to the '+' terminal. Press the probes against the positive and negative terminals of the battery with light pressure.
If your battery is new, you should see approximately 1.5V on the display (the battery in the picture below is brand new, so its voltage is slightly higher than 1.5V). If you touch the black probe to the + terminal and the red probe to the – terminal, nothing bad happens, but you will see a negative voltage as in the picture.
Now suppose you want the circuit you are using to operate at 5V (DC) and let's check the connections. If we read voltage values above or below 5V, something has been done wrong and the connections may need to be checked again.
Set the multimeter to DC 20V. Multimeters are generally not auto-ranging. You need to set the multimeter to a range it can measure. Therefore, you may need to move the knob up or down in values. For example, if you set the knob to the 2V position, you measure up to 2V; if you set it to the 20V position, you measure up to 20V. In this example, since we want to measure 5V, we set the knob to the 20V position. (If you set it to the wrong position, you will see the value "1" on the display. In that case, turn the knob upwards and find the correct range.) As seen, there is 5V DC in the circuit and no problem.
Measuring resistance (ohm) with a multimeter
Resistors have color codes on them. Normally, the ohm value of a resistor can be found by reading these color codes.
The resistance value can also be measured with a multimeter. Here's how:
Select a random resistor and set the multimeter to the 20kΩ range. Then, touch the probes to the resistor legs with a pressure as if pressing a key on a keyboard.
As shown in the picture below, suppose you see a value of 0.97. This means that the resistor in your hand is 970 Ω. Because the multimeter measured in kΩ and to find it in Ω, you must multiply by 1000. 0.97 kΩ × 1000 = 970 Ω
Reminders
- If you saw the value "1" on the multimeter display, you would need to move the multimeter knob up to the 200kΩ position.
- If you saw "0" on the display, you would need to move the multimeter knob down to the 2kΩ position.
Measuring current (ampere) with a multimeter
When measuring current with a multimeter, you need to connect the multimeter probes in series with the circuit elements. To place the multimeter in series, you need to place the red probe on the terminal of one component and the black probe on the terminal of the next component, as in the picture below. The multimeter acts like a conductor in your circuit. If you disconnect the multimeter, your circuit will not work. The range selection of the multimeter knob should be done with the same logic as in resistance and voltage measurement. (For example, in the picture below you can see a multimeter set to the 20mA range measuring a current of 11.7 mA.)
Multimeter continuity test
Some people also call this continuity test multimeter open circuit or multimeter short circuit test. This feature allows you to test the continuity of a circuit. This feature helps you easily detect faulty wiring, broken wires and similar faults. It also helps you check whether two points in the circuit are connected.
To perform this test, the multimeter must be set to the buzzer position.
Multimeter buzzer position
To find the buzzer position, look for a diode symbol with radiating waves around it (like sound coming from a speaker) and set the multimeter knob to this position. Touch the two probes together and you will hear a continuous sound when they are connected. This is an indication that the multimeter can measure continuity.
When you touch the probes to two opposite ends, if there is a very low resistance, less than a few ohms, between the two points, it understands that the two points are electrically connected and you hear a continuous sound.
If the sound is not continuous or you hear no sound, it means that the thing you are testing has a faulty connection or is not connected at all.
WARNING: You must turn off the system to test this feature. Make sure there is no power in the circuit.
What should be considered when buying a multimeter?
There are multimeters that automatically change their internal ranges to find the voltage, resistance or current of the circuit or circuit element you are measuring. If you know how to use them, auto-ranging multimeters can do the job. Auto-ranging multimeters are higher quality and usually have more features. However, the voltage or current of a circuit can fluctuate quite rapidly. In some systems, the current or voltage is so irregular that the auto-range cannot be maintained precisely. Be sure to take this into account.
A backlit LCD screen looks flashy and will make your job easier, especially if you work in the field at night or in a workshop with low light levels.
If the knob that changes the multimeter values turns a bit stiffly and clearly, this is also a good feature. Also, make sure the probe cables are sturdy. Over time, cables can wear out.
Auto power off is a feature rarely seen in cheaper multimeters. If you choose a model with auto power off, you can make the battery last longer.
Some of the newer multimeters come with a range of advanced functions including Bluetooth readings, temperature readings, compatibility with smartphones, a high-quality graphic display and extended capabilities.
What is the difference between a multimeter and an avometer?
There is no difference between a multimeter and an avometer. They both mean the same thing. Avometers are slightly older models of multimeters.